4. Combat Phase
Combat between phasing units and adjacent enemy units are resolved in this Phase.
Clarification
Remember that the Western and Soviet factions are considered enemy factions to each other. So unless otherwise restricted, combat can occur between them.
4.1 Blitz Combat Segment
The phasing faction performs actions in the Blitz Combat Segment are in the following order:
Step 1: Airdrop (4.1.1)
Step 2: Blitz Combat (4.1.2)
Step 3: Beachhead Landing (4.1.3)
Step 4: Airdrop Landing (4.1.4)
Step 5: CV Strike Returns (4.1.5)
Clarification
You perform all activities in a step before moving on to the next. For example, you can’t perform an Airdrop Landing and then conduct Blitz Combat with the unit. If the phasing faction does not have a Blitz marker on the map, the only step it would need to perform is the CV Strike Returns step.
4.1.1 Airdrop
A faction may use a supplied, Blitz-enabled airborne ground unit in a Land hex to conduct an Airdrop. To do so, flip the unit over to its Airdrop marker side and place it within two hexes of its current location. The placement hex does not have to be in a Blitz-enabled location.
Design Note
Airdrop markers provide a combat shift, negate EZOC, block Retreat paths and supply lines.
Airdrops are conducted one at a time, and may continue as long as there are phasing supplied, Blitz-enabled airborne or helicopter units.
An Airdrop marker can be placed in a hex containing enemy ground units or markers.
An Airdrop marker can be placed in a hex containing friendly units and markers, including other Airdrop markers.
An Airdrop marker can be placed in hexes affected by Mud, Storms, or Snow.
Airdrop Path: The range is traced from the origin hex to the placement hex. Do not count the origin hex, but do count the placement hex. Airdrop markers can be placed in their origin hexes (although it makes little sense to do so).
Airdrop Restrictions:
- An Airdrop marker cannot be placed in an All-Sea hex (even one with a Beachhead marker).
- An Airdrop marker cannot be placed in or adjacent to a hex containing an enemy Air unit.
- An Airdrop marker cannot be placed during Pre-War (12.1).
- An Airdrop marker cannot be placed in a hex in a Neutral Minor Country (13.4) or Policy Affected Country (13.6), nor can an Airdrop Path be traced across a hex in such country.
- Airdrop marker placement can be limited by Policies (13.6.1), Truces (13.6.2), and Failures rules (14.12).
Clarification
Airdrop marker placement cannot be “contested” by enemy Support units.
4.1.2 Blitz Combat
Blitz Combat proceeds as per the Regular Combat Segment (4.2) with the following modifications:
- Units or markers belonging to the attacker must be Blitz-enabled to attack or provide CRT column shifts (4.2.3). Units belonging to the defender do not have to be Blitz-enabled.
Clarification
An HQ unit belonging to the defender can lend HQ Ranged Support even if it is not Blitz-enabled.
4.1.3 Beachhead Landing
If a supplied, Blitz-enabled ground unit is in a hex containing a Beachhead marker, and it did not attack in the current Blitz Combat Segment, it may conduct a Beachhead Landing.
To do so, take the unit and place it in the Land hex adjacent to the marker’s Beachhead Hexside. This is not movement, so ignore the unit’s MA and any MP costs.
Clarification
It is also not Advance After Combat, so HQ units may conduct Beachhead Landings.
Units conducting a Beachhead Landing are placed one unit at a time. There is no limit to the number of units that can conduct a Beachhead Landing.
A Beachhead Landing can be conducted during Mud, Storms, or Snow turns.
Beachhead Landing Restrictions:
- An unsupplied unit cannot conduct a Beachhead Landing.
- A unit cannot conduct a Beachhead Landing into a hex containing an enemy unit.
- A unit cannot conduct a Beachhead Landing into a hex in a Neutral Minor Country (13.4).
- Beachhead Landings can be limited by Policies (13.6.1), Truces (13.6.2), and Failures (14.15).
△ 4.1.3.1 Special SNLF Landing
If the Axis faction has a supplied SNLF Beachhead-0 marker on the map, it may conduct a Special SNLF Landing with that marker by taking a Japanese Detachment marker from the Axis Force Pool and placing it in the Land hex adjacent to the SNLF Beachhead-0 marker’s Beachhead Hexside.
Special SNLF Landing Restrictions:
- An unsupplied SNLF Beachhead-0 cannot conduct a Special SNLF Landing.
- An SNLF Beachhead-0 cannot conduct a Special SNLF Landing into a hex containing an enemy unit. A Special SNLF Landing can be conducted into a hex containing an enemy Detachment or Logistics marker; place the enemy marker in the Delay Box.
Clarification
Note that no ground unit is required to conduct a Special SNLF Landing – that’s because many of the initial Japanese landings in December 1941 were regiment-sized or smaller. Also keep in mind that SNLF Beachhead-0 markers are inherently Blitz-enabled.
4.1.4 Airdrop Landing
If an Airdrop marker is unsupplied or stacked with an enemy unit, place the Airdrop marker in the Delay Box.
If an Airdrop marker is supplied and not stacked with an enemy unit, it may conduct an Airdrop Landing.
Clarification
If you can’t or don’t want to conduct an Airdrop Landing, simply place the Airdrop marker in the Delay Box.
To conduct an Airdrop Landing, take a one-step infantry unit of the same nationality from its Force Pool, place it in the hex containing the Airdrop marker, and place the Airdrop marker in the Delay Box.
The Western Airdrop marker can be replaced with either a British or US one-step infantry unit.
Elite (2.3.4.3) infantry units cannot be placed in a hex in an Airdrop Landing.
4.1.5 CV Strike Returns
All CV Strike units in hexes are placed in that Naval Zone’s Used Box.
4.2 Regular Combat Segment
For these rules, the phasing faction is the attacker, and the non-phasing faction the defender.
A faction need not have a Blitz marker on the map to attack in its Regular Combat Segment.
4.2.1 Attacks
The phasing faction may declare an attack with his ground units against one adjacent hex containing enemy ground units, Detachment markers, or Logistics markers. A complete Attack Sequence (4.2.2) for that attack must be resolved before another attack can be declared. In a Combat Segment, a faction may declare as many attacks as it wishes and is eligible to perform, but the attacks are resolved one at a time.
A hex can be attacked only once per Combat Segment, and all units in that hex must be involved in the combat. The defender cannot withhold units from that combat, nor can the attacker separately attack individual units within the hex.
If defending units Retreat from one attack and end up in a hex that is the target of another attack in the same Combat Segment, they are included in the defense of that hex.
A phasing ground unit can attack only once per Combat Segment.
Phasing ground units do not have to be supplied to attack in a Combat Segment.
Phasing units in the same hex can attack different hexes. In addition, some units in the same hex can attack while others in that hex are withheld from attacking.
Ground units in hexes with enemy or friendly Air units or Airdrop markers can attack and can be attacked.
4.2.1.1 Attack Restrictions
Attack Factor Restrictions:
- A phasing unit with an Attack Factor of 0 cannot attack.
- If the attacker cannot muster at least a raw 1-3 odds ratio (see Step 3 of 4.2.2 but exclude any defending HQ providing Ranged Support and all Combat Shifts for this calculation), the attack cannot be made.
Minor Country Restrictions:
Units from different Minor Countries cannot attack the same hex. Exception: Exp units can attack with any other units of the same faction.
ClarificationNot all of the Minor Country units have to be Exp units. For example, the Axis faction could have a Japanese unit, a regular Siamese unit, and a Hopeh Exp unit participate in an attack. The Axis faction could not then add a regular Hopeh unit to that attack however.
Put another way, an attack may include any of that faction’s Major Country units, any of one Minor Country’s units, and finally any Exp units from other Minor Countries.
A unit belonging to a Minor Country with a Free Passage (14.16), Mobilizing (14.32), or No Occupation (14.34) marker in its Capital cannot attack a hex outside that Minor Country or one of its Dependents.
Terrain Restriction:
- Units cannot attack across All-Sea hexsides. Exceptions: Supplied marine units can attack across All-Sea hexsides (4.2.1.3). Any unit can attack across an All-Sea hexside that is also a Beachhead Hexside.
Other Restrictions:
- A unit cannot attack if Pre-War (12.1) is in effect.
- Combat can be limited by Policies (13.6.1), Truces (13.6.2), and Failures (14.15).
Clarification
Axis Kwantung units can attack a hex outside a Japanese Dependent.
4.2.1.2 HQ Ranged Support
A supplied HQ unit has the ability to participate in combat even if it is not adjacent to the defending hex (when attacking) or in the defending hex (when defending). It does this by providing Ranged Support.
Design Note
Ranged Support represents the commitment of reserves, heavy equipment and local air assets to a battle.
△ An HQ unit can provide Ranged Support to any combat that includes a ground unit of the same nationality as the HQ unit. Exceptions: A Soviet Communist Chinese HQ can provide Ranged Support to any Communist Chinese ground unit. A Western Nationalist Chinese HQ can provide Ranged Support to any Nationalist Chinese ground unit.
Clarification
An HQ unit cannot provide Ranged Support to a friendly Detachment or Logistics marker alone in a hex. An HQ unit also cannot, by itself, use Ranged Support to attack a non-adjacent hex.
An HQ unit providing Ranged Support includes its Attack Factor (when attacking) or Defense Factor (when defending) to a combat within two hexes of its current location. Ranged Support also applies a CRT column shift to that attack or defense.
HQ Ranged Support Path: When providing Ranged Support a path is traced from the HQ unit’s hex to the defending hex. Do not count the HQ unit’s hex, but do count the defending hex.
The path cannot be traced into a hex inside a Neutral Country or Policy Affected Country, or any Dependent belonging to a Neutral Country or Policy Affected Country.
Clarification
It can be traced through a hex containing an enemy unit or across an All-Sea hex.
HQ Ranged Support Restrictions:
An HQ unit that has participated in combat cannot provide Ranged Support to another combat later in the same Combat Segment.
ClarificationThis means you can “soak off” a defending HQ by attacking its hex, thereby preventing it from providing Ranged Support to another hex.
One HQ unit per faction can participate in an individual combat.
ClarificationSo a defending HQ unit cannot provide Ranged Support to a defending hex that already includes an HQ unit.
An HQ unit stacked on a Beachhead marker cannot provide Ranged Support except across that marker’s Beachhead Hexside.
Design NoteAn HQ unit on a Beachhead is considered to be deeply engaged in defending and expanding its perimeter, so it can’t throw Ranged Support elsewhere.
4.2.1.3 Marine Assault
A supplied marine unit may attack across any All-Sea hexside, even without being stacked on a Beachhead marker.
4.2.2 Attack Sequence
If the attack is declared against a hex that contains an enemy Detachment or Logistics marker and no enemy ground units, the attack automatically succeeds. The attacker may use Advance After Combat to enter the hex (4.2.7). No Exploitation is possible (4.2.8). Place the Detachment or Logistics marker in the Delay Box.
If the attack is declared against a hex that contains an enemy ground unit, complete these steps in order:
Step 1: The attacker declares which adjacent friendly ground units will attack the targeted hex. If the attacking units do not already include an HQ unit, the attacker may declare one supplied HQ unit to provide Ranged Support.
Step 2: If the defending hex does not have an HQ unit in it, the defender may now declare one supplied HQ unit to provide Ranged Support.
Step 3: Add up the Attack Factors of all attacking units (including an HQ unit providing Ranged Support). This is the Attacker Total. Add up the Defense Factors of all defending units (including an HQ unit providing Ranged Support). This is the Defender Total. Divide the Defender Total into the Attacker Total and express the result as one of the ratios found along the top of the Combat Results Table (CRT). Round any fractional results in favor of the defender. Odds greater than 9-1 or less than 1-3 are treated as 9-1 or 1-3 respectively.
Example: If the Defender Total was 4 and the Attacker Total was 11, the odds ratio is 2-1 after rounding off in the defender’s favor. If the attacker had one more Attack Factor, he would have 3-1 odds.
Step 4: Determine the CRT column shifts (4.2.3) applicable to the attacker and defender. All shifts are cumulative – add all attacker shifts and then subtract all defender shifts. Apply the net column shift to the column determined in Step 3. The result is the CRT column the combat will be resolved on in Step 5. Shifts above 9-1 or below 1-3 are resolved on the 9-1 or 1-3 columns, respectively.
Design Note
Never underestimate the importance of CRT column shifts. A 3-1 attack that receives three column shifts to the right would be resolved on the 9-1 column. Woo-hoo!
Step 5: The attacker rolls one die and cross-indexes the result with the CRT column determined in Step 4. Note the Combat Result (4.2.4), modifying it for Mud, Storms, or Snow when applicable (11.2).
Step 6: Resolve any Retreats (4.2.5).
Step 7: Apply any Attrition (4.2.6) results, first to the attacking force, then to the defending force.
Step 8: If the defending hex has been vacated, surviving attacking units may now Advance After Combat (4.2.7) or conduct Exploitation (4.2.8).
Clarification
Defending units cannot advance into a hex vacated by the attacker.
4.2.3 CRT Column Shifts
4.2.3.1 Air Unit (Air Force or CV Strike)
The attacker receives a one-column shift to the right for each phasing Air unit (of the same nationality as at least one of the attacking units) in or adjacent to the defending hex.
The defender receives a one-column shift to the left for each non-phasing Air unit (of the same nationality as at least one of the defending units) in or adjacent to the defending hex.
An Air unit can provide a shift to any number of combats in the same Combat Segment.
Exceptions:
- An Air unit cannot provide a shift if the defending hex is affected by Mud.
- An Air unit cannot provide a shift if the defending hex is affected by Storms or Snow, and the Air unit is adjacent to that hex. An Air unit does provide a shift if it is in the defending hex itself.
Clarification
An appropriate multi-national HQ (such as the Western CBI) providing ranged support may be sufficient to claim that a unit “of the same nationality” is one of the attacking or defending units, and thus eligible for an Air unit shift.
Design Note
When placing Air units, remember they cannot be placed in the same hex or in hexes adjacent to one another. This often presents the attacker with a dilemma. To receive multiple Air Unit shifts against a single hex, multiple Air units need to be placed adjacent to the defender’s hex (up to three can be placed around it). However, if an Air unit is placed in the defending hex itself, the enemy will not be able to place replacements, combine units, or move new ground units into that hex. In effect, an Air unit has interdicted that hex. The downside is that placing an Air unit directly on the defending hex means the attacker can only receive one Air unit CRT shift.
4.2.3.2 Airdrop
During the Blitz Combat Segment only, the attacker receives a one-column shift to the right for each Airdrop marker in the defending hex, regardless of nationality.
4.2.3.3 Armor
During the Blitz Combat Segment only, the attacker receives a one-column shift to the right if at least one of the attacking units is a supplied, Blitz-enabled armor-type unit.
Clarification
That’s one shift total, not one per armor unit. And only during Blitz Combat, not Regular Combat.
4.2.3.4 Fortress
The defender receives a one-column shift to the left if the defending hex contains a fortress unit. It does not have to be supplied.
4.2.3.5 HQ
The attacker receives a one-column shift to the right if one of the attacking units is a supplied HQ unit (including one providing Ranged Support).
The defender receives a one-column shift to the left if one of the defending units is a supplied HQ unit (including one providing Ranged Support).
Clarification
Note that a defending HQ unit does contribute its defense factor (and HQ Shift) to any attack against its hex, even if it provided Ranged Support to another attack earlier in the same Combat Segment.
This shift is in addition to the combat factors contributed to the combat.
4.2.3.6 Marines
If a supplied, Blitz-enabled marine unit attacks across a Beachhead, Strait or All-Sea hexside, the attacker receives a one-column shift to the right.
Clarification
The defender still receives his column shift for the terrain. So, if a marine unit attacked across an All-Sea hexside, the net shift would be one to the left.
4.2.3.7 Mud
The defender receives a one-column shift to the left if the defending hex is affected by Mud (11.3).
Clarification
Storms and Snow do not provide a column shift.
4.2.3.8 Terrain
The defender may receive one or more column shifts to the left based on the terrain in the defending hex and along the hexside(s) separating the adjacent attacking units from that hex. See the Terrain Effects Chart on the map to determine the shifts.
Important: A hexside shift is in addition to those for hex terrain. However, only one hexside shift is applicable, and it must be the lowest hexside shift out of all the different hexside terrain types being attacked across.
Example: A defender in a clear hex being attacked from across a river hexside in one direction, and a mountain hexside in another, receives only one shift to the left.
If the defender was in a City instead of a clear hex, it would receive two shifts to the left – one for the City and one for the river.
4.2.4 Combat Results
There are two types of results on the Combat Results Table, a Retreat Result and an Attrition Result.
Retreat Results are always applied before Attrition Results.
Clarification
Retreat Results are italicized on the CRT, to remind you to perform them first.
Important: Only units involved in a specific combat are affected by its results.
Clarification
So if a unit in a hex was left out of an attack, it just sits there. It does not suffer an attacker step loss, Retreat, Advance After Combat, or anything else.
4.2.4.1 Retreat Results
Apply these before Attrition Results. See 4.2.5 on how to satisfy a Retreat Result.
Ad – Attacker Defeated. All attacking ground units must Retreat one hex, or one of the attacking units must take a step loss (4.2.6.1). If Retreat is possible, the attacker chooses which to do.
Clarification
Yes, only one of the attacking units takes the loss
Ex – Exchange. All attacking ground units must Retreat one hex, or one of the attacking ground units must take a step loss (4.2.6.1). If Retreat is possible, the attacker chooses which to do.
If the attacker Retreats, the defender does nothing.
If the attacker takes the step loss, then all ground units in the defending hex must Retreat one hex, or one of the defending ground units must take a step loss. If Retreat is possible, the defender chooses which to do.
Dr1, Dr2, Dr3 – Defender Retreat. All ground units in the defending hex must Retreat the indicated number of hexes. If Retreat is not (or is no longer) possible, the remaining unsatisfied Retreat result is converted into step losses on a one-for-one basis until either the full Retreat result is satisfied or Retreat becomes possible again (4.2.5.3).
Weather Effects on Combat: Reduce the Dr result against a defending hex affected by Mud, Storms, or Snow as follows:
- Dr3 becomes Dr2
- Dr2 becomes Dr1
- Dr1 becomes Ex
Ex, Ad, and Attrition results are not affected by Mud, Storms, or Snow.
4.2.4.2 Attrition Result
Apply these after Retreat Results. See 4.2.6 on how to satisfy an Attrition result.
# / # – The number to the left of the slash is the number of step losses taken by the attacker and is applied first. The number to the right of the slash is the number of step losses taken by the defender.
4.2.5 Retreat
The owning faction takes the Retreating unit or stack and places it in any adjacent Land hex or All-Sea hex containing a friendly Beachhead marker, as limited by Retreat Priorities below.
If necessary, the owning faction then does this again (from the current hex) until the Retreat result is fully satisfied.
Retreat is not considered movement, so ignore a unit’s MA, MP costs, or movement restrictions. Retreat has its own restrictions below (4.2.5.2).
A force Retreats one hex at a time. Retreat Priorities and Retreat Restrictions are checked each time before the force Retreats from its current hex.
Clarification
So you don’t look at every possible Retreat path all at once. Just do it one hex at a time.
Defending stacked units must Retreat together into the same hex. Attacking stacked units that participated in the combat must also Retreat together into the same hex. Attacking units located in different hexes do not have to Retreat into the same hex, but the individual stacks must remain together.
Clarification
Non-attacking units in a stack that suffers an Ad result do not Retreat.
Important: If a force Retreats into a hex containing other ground units, all ground units in that hex are now part of the Retreating stack and must be included in any remaining Retreats and Attrition results that have yet to be fulfilled.
Clarification
In other words, it’s a rout! Note that just ground units are caught up in the rout, not friendly support units or markers like Detachments.
In addition, units joining a Retreat stack in this fashion are considered to have been involved in that original combat.
Example: A unit Retreats into a hex containing an HQ unit. That HQ is now part of the Retreating force and is considered to have participated in the combat. That means the HQ cannot provide Ranged Support to another combat later in the same Combat Segment. Doh!
Units can Retreat out of a hex containing an enemy Air unit or Airdrop marker.
Mud, Storms, or Snow do not affect the Retreat procedure.
Clarification
Bad weather may have affected the Retreat Result, but it won’t affect how to apply it.
4.2.5.1 Retreat Priorities
The owning faction must Retreat its units into a hex that meets the following priorities, which are checked in order:
Priority 1: The hex to be Retreated into must be farther away from the defending hex than any previous hex Retreated into, and it cannot contain an EZOC.
Priority 2: If no hex exists that meets Priority 1, then the Retreat must enter a hex that is farther away from the defending hex than any previous hex Retreated into, and it must contain a friendly ground, Airdrop, or Air unit.
If no hex exists that meets Priority 1 or 2, the force cannot Retreat.
If within a specific Priority there is more than one hex available to Retreat into, the owning faction chooses the hex.
Clarification
You may not “double back” or retreat into a hex that is not further away from the defending hex, even if an EZOC does not extend into the hex. Terrain features, such as All-Sea or Mountain hexsides, and enemy units do not affect the requirement that each hex of the Retreat be “farther away.”
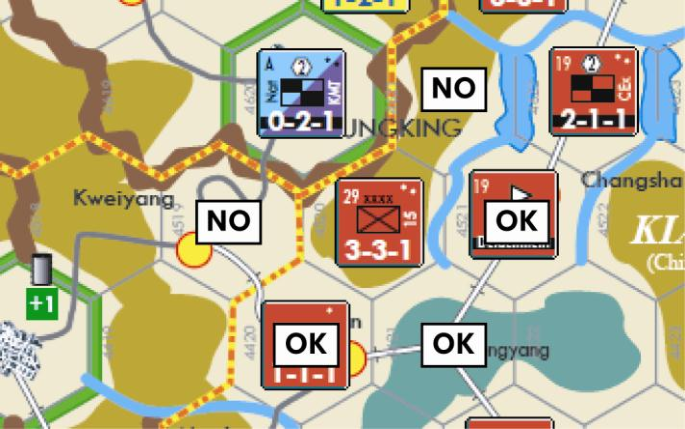
Example: The Japanese 15th Army in w4520 attacks the Nationalist Chinese HQ unit in Chungking (w4620) and gets an Ad result. It cannot retreat into the hexes labeled “No.” Although there is no EZOC in those hexes (because of the mountain hexsides), those hexes are not further away from Chungking than w4520 is.
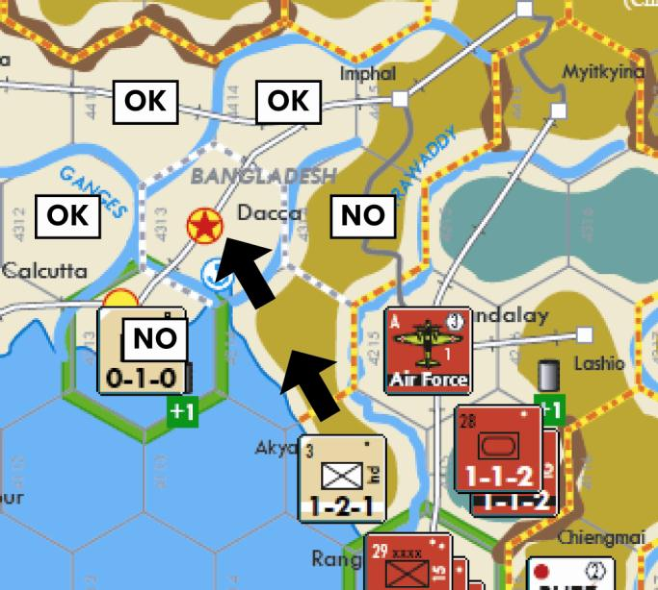
Example: The British unit in Akyab (w4114) must fulfill a Dr3 result. If it Retreated first to w4214 and then to Dacca (w4313), it cannot then Retreat to Calcutta (w4213) or w4314. Despite the All-Sea hexside, Calcutta is only two hexes away from Akyab, the same distance as Dacca. The unit would instead have to retreat to w4312, w4413, or w4414.
4.2.5.2 Retreat Restrictions
A force cannot Retreat if it includes a unit with a Movement Allowance of 0, and that unit participated in the combat.
A force cannot Retreat if it includes an HQ unit (including one providing Ranged Support) that participated in the combat.
A unit cannot Retreat into an Off-Map Box.
A unit cannot Retreat into a hex containing an enemy unit, Airdrop marker, or Beachhead marker.
Clarification
It can Retreat into a hex with an enemy Detachment or Logistics marker, or a friendly Airdrop or Beachhead marker.
A unit cannot Retreat across an All-Sea hexside unless it is a Strait or Beachhead Hexside (i.e., the hexside that the Beachhead marker’s arrow points to).
Example: A unit in Taihoku (w4324) can Retreat into Foochow (w4424) but not into Amoy (w4323).
A unit cannot Retreat into a hex belonging to a Neutral Minor Country (13.4) or Policy Affected Country (13.6).
4.2.5.3 Retreat Conversion
Mandatory Retreat Conversion: If a Retreating force cannot (or can no longer) Retreat without violating both Retreat Priorities or any of the Retreat Restrictions listed above, that force stops Retreating. The owning faction must now convert the remaining unsatisfied Retreat result into step losses on a one-for-one basis until either the full Retreat result is satisfied or Retreat becomes possible again.
Example: A force suffers a Dr3 result. It Retreats two hexes into a hex with an HQ unit, which now becomes part of the Retreating force. Since a force with an HQ cannot Retreat, it must convert the last unsatisfied Retreat result into a step loss.
Design Note
You can do a lot of damage by forcing enemy units to Retreat back onto their HQ units, or by herding enemy units into an overstacked situation. Retreating units may violate Stacking Limits during and at the end of their Retreat, but such stacks will have to conform to them when that Combat Segment is over.
A force must continue Retreating again if whatever condition temporarily prevented its Retreat no longer applies, until the Retreat result is fully satisfied.
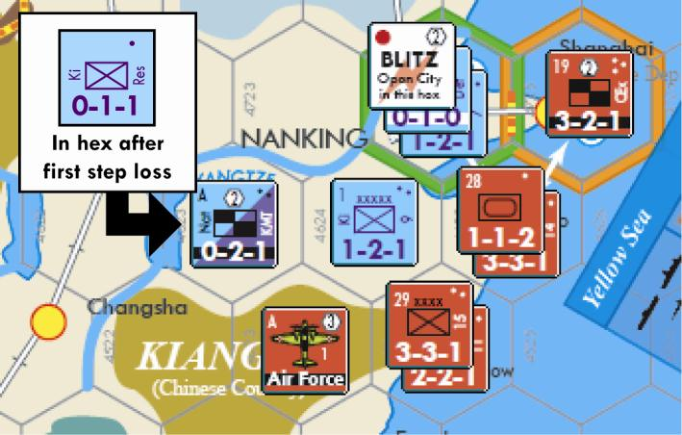
Example: The Western defending force includes the Kiangsu 9th War Zone and KMT HQ unit providing Ranged Support. It suffers a Dr3 result. The Western faction must take a step loss. It chooses the HQ, breaking it down and replacing it with a one-step infantry unit. Since the Retreating force no longer has an HQ unit, the 9th War Zone must Retreat and fulfill the other two results. It could retreat into w4723 or into w4623.
Note that the one-step Kiangsu Res infantry unit located in w4623 (where the HQ was) would not initially be considered part of the Retreating stack, so it would not have to Retreat unless the 9th War Zone chose to retreat into that hex. At that point, it would join the stack as the Retreat continues into w4722 or w4522. (The lake hexside prevents a retreat into w4622.)
Voluntary Retreat Conversion: A defending force may convert Retreat results into step losses on a one-for-one basis if either or both of the following situations applies:
- All adjacent attacking ground units are attacking across Strait, Beachhead, or Mountain hexsides.
- The defending hex contains a City and does not contain a Blitz marker.
Important: Defending units Retreating through Cities or across Strait, Beachhead, or Mountain hexsides do not receive this Voluntary Retreat Conversion option.
Design Note
While defenders could turn an urban center like Stalingrad into a fortress, if it was on the verge of capture they would be just as likely to declare it an “open city” and abandon it to protect the historic landmarks and civilians within. A historical example of this is Manila in 1942.
4.2.6 Attrition
A faction satisfies Attrition results by eliminating steps from any of its ground units involved in that combat (including an HQ unit providing Ranged Support).
To do so, the faction declares which unit will suffer a step loss and reduces its step value by one. The faction continues to eliminate steps in this fashion until the Attrition result is fully satisfied or all of its units that took part in that combat are eliminated.
Unless stated otherwise, the owning faction chooses which unit or units will lose the steps.
Clarification
So the step losses from an Attrition result can be spread among different units. But be sure to pay particular attention to the “Attacker Losses” rule below.
4.2.6.1 Attacker Losses
If an attacking force suffers losses in a combat (either through Attrition or an Ad or Ex result), it may be required to eliminate certain steps as its first loss in a combat:
- If an attacking force includes a marine unit attacking across an All-Sea, Beachhead, or Strait Hexside, the first step loss that force suffers must be a marine step.
- If an attacking force includes an armor-type unit, the first step loss that force suffers must be an armor-type step from an armor- type unit.
If both conditions apply, the attacker must choose between a marine or armor-type step to fulfill its “first step loss.” After fulfilling any required first step loss, the owning faction may assign its remaining combat step losses as it wishes.
Clarification
If you have marine and armor units in an attack, the first loss must come from either unit, but after that you can assign the losses as you wish. You do not have to eliminate the other unit as your next loss.
Example: An attacking US force on a Beachhead consisting of a 7-6- 2 three-step mech unit and a 4-4-1 two-step infantry army suffers an Ad 1/0 result. Because the force is on a Beachhead it cannot Retreat. So the Ad result must be converted to a step loss, which must be an armor step, which reduces the 7-6-2 mech to a 4-4-1 infantry unit. The required Attrition loss may be taken from either remaining unit.
4.2.6.2 Eliminating Steps
When a unit is removed from its location due to the elimination of one or more steps, it is placed in the Delay Box if it has a Delay Stripe. Otherwise, place it in its Force Pool. Exception: The Japanese IG HQ is removed from the game when eliminated.
Eliminating One-Step Units: To eliminate a one-step unit, remove it from its location.
Eliminating Steps from Two-Step Units: To eliminate a step from a two-step unit with a one-step unit on its other side, simply flip the unit over to its one-step side.
To eliminate a step from a two-step unit without a one-step unit on its other side, the owning faction takes a one-step unit from the Force Pool that could have been used to combine the two-step unit. He places it where the two-step unit is and removes the two-step unit from its location.
Clarification
This applies to a two-step unit that has a three-step unit on its other side, or nothing at all – either way it does not have a one- step unit on its other side.
Eliminating Steps from Three-Step Units: To eliminate a step from a three-step unit, simply flip the unit over to its two-step side.
Example: A US 7-6-2 three-step mech unit loses a step. The unit is flipped over to its 4-4-1 two-step side. Whether attacking or defending, that just cost an armor step.
Holding Box units: A multi-step unit that has a Holding Box in its Force Pool is reduced in steps using the above procedure and the corresponding unit in its Holding Box.
Example: The Western two-step ABDA multi-national infantry army suffers one step loss while defending in combat. The Western ABDA Holding Box contains a Netherlands East Indies infantry unit. The Western faction can choose to eliminate the NEI unit in the Holding Box and leave the British FE infantry unit in the hex. Or it can eliminate the British FE infantry unit and take the NEI unit from the Holding Box and place it in the hex.
Eliminating Steps Restrictions:
- Elite units (2.3.4.3) cannot be taken from a Force Pool and placed in a hex or Off-Map Box unless that unit was necessary to combine into that multi-step unit.
- A player cannot switch different multi-step units in the process of combining.
4.2.7 Advance After Combat
After all results of a combat have been satisfied by both sides, if the defending hex does not contain an enemy unit or Beachhead marker, then a supplied ground unit of the attacking force can Advance After Combat.
To do so, the attacker takes the unit and places it in the defending hex.
Advance After Combat is not considered movement, so ignore a unit’s MA, MP costs, or movement restrictions. Advance After Combat has its own restrictions below.
Any number of the attacking supplied ground units can Advance After Combat.
Advance After Combat is conducted one unit at a time, and can continue as long as there are units eligible to perform one.
Clarification
Watch out for stacking limits! You can exceed them, but someone will die if you’re still overstacked at the end of the Combat Segment.
A unit can Advance After Combat out of a hex containing an EZOC or an enemy Air unit.
A unit can Advance After Combat into a hex containing any enemy marker except a Beachhead.
Advance After Combat is not affected by Mud, Storms, or Snow.
Advance After Combat Restrictions:
- A unit with a Movement Allowance of 0 cannot Advance After Combat.
- A unit cannot Advance After Combat into a hex it would be prohibited from entering during a Movement Phase (3.1.4).
Clarification
An Axis Kwantung unit typically cannot Advance After Combat or Exploit into a hex outside a Japanese Dependent, because it cannot move into such hexes unless Russia, Communist China and Nationalist China are all not Policy Affected Countries.
- An HQ unit cannot Advance After Combat. The presence of an HQ unit in an attacking force does not prevent the non-HQ units from advancing. △
- A unit that is not adjacent to the defending hex cannot Advance After Combat.
Clarification
This restriction prohibits the remnants of an HQ providing Ranged Support to the attack from Advancing After Combat.
4.2.8 Exploitation
If a supplied ground unit is eligible to conduct an Advance After Combat (but before it conducts one), and the attacking force included an armor-type unit (even if it did not survive the combat), it may conduct Exploitation instead of Advance After Combat.
To do so, the attacker takes the unit and places it in the defending hex. Then, he takes the unit (from the current hex) and places it in any adjacent Land hex.
The attacker may continue to do this again until the unit has gone its full Exploitation Distance. A unit is not required to go its full Exploitation Distance.
Exploitation is not considered movement, so ignore a unit’s MP costs or movement restrictions. Exploitation has its own restrictions below.
Any number of the attacking supplied ground units can conduct Exploitation.
Exploitation is conducted one unit at a time and can continue as long as there are units eligible to perform it. All attacking units in a stack do not have to conduct Exploitation into the same hex beyond the initial defending hex.
An Exploiting unit must stop if it is placed in a hex containing an EZOC unless another friendly unit is in that hex, in which case it can continue.
An Exploiting unit must stop if it is placed in a hex across an All-Sea, Beachhead, Mountain, or Strait Hexside.
Design Note
Difficult terrain and combat fatigue limit pursuit.
A unit can conduct Exploitation out of a hex containing an enemy Air unit.
Exploitation is not affected by Storms or Snow.
Exploitation Distance: The total number of hexes an Exploiting unit can enter is equal to:
- The number of hexes the defending force actually Retreated (i.e., the number of different hexes it was placed in), plus
- The number of Retreat and/or Attrition results the defender did not satisfy in some fashion.
The defending hex does count as one of the Exploitation hexes.
Example: A Russian one-step ground unit suffers a Dr3 0/1 result. It Retreats three hexes and then is eliminated. The Exploitation Distance is 3. The attacking force can be placed in up to three hexes – that is, the defending hex and two other hexes.
A Russian infantry unit in Chita (e3609) suffers a Dr1 0/1 result. The Soviet faction performs an Optional Retreat Conversion (4.2.5.3) and converts the Dr1 result to a step loss, satisfying that result and eliminating the unit. The Exploitation Distance is 1 because one Attrition result is unsatisfied. In this case, Exploitation is no different than Advance After Combat.
Exploitation Restrictions:
- A unit with a Movement Allowance of 0 cannot conduct Exploitation.
- A unit cannot conduct Exploitation into a hex affected by Mud.
- The Exploitation Distance for a unit cannot exceed its Movement Allowance. If it does exceed, reduce the Exploitation Distance (for that unit only) to match the unit’s MA.
Design Note
This restriction is very important. Because of the reduced MAs in DS (compared to TK), most units will not be able to Exploit, and even those that can Exploit will only get to go two hexes before stopping.
- A unit cannot conduct Exploitation into a hex it would be prohibited from entering during a Movement Phase (3.1.4).
- A unit cannot conduct Exploitation into a hex containing an enemy unit.
- A unit belonging to a Minor Country with a Free Passage (14.15), Mobilizing (14.32), or No Occupation (14.34) marker in its Capital cannot conduct Exploitation into a hex outside that Minor Country or one of its Dependents.
- A unit cannot conduct Exploitation into an Off-Map Box.
- Exploitation can be limited by Policies (13.6.1), Truces (13.6.2), and Failures (14.15).
4.3 Marker Segment
In this Segment, the phasing faction adjusts some markers on the map before conducting its Reserve Movement Phase. Perform these steps in order:
Step 1: If the phasing faction has a Troop Convoy marker in a Naval Zone’s Used Box, it may move that marker back to the Naval Zone’s Convoys Box.
Clarification
This will allow you to use the marker for transport during the upcoming Reserve Movement Phase.
Step 2: If the phasing faction has a Blitz, Totsugeki, Failure, or Mobilizing marker on the map, it must remove the marker and set it aside for future use.
△ Step 3: If the Axis faction has an SNLF Beachhead-0 marker on the map, it must remove the marker and set it aside for future use. After all such markers have been removed, Axis ground units in an All-Sea hex without a friendly Beachhead marker are eliminated. Eliminated units that have a Delay Stripe are placed in the Delay Box; all others are returned to their Force Pool.